When you click on links to various merchants on this site and make a purchase, this can result in this site earning a commission. Affiliate programs and affiliations include, but are not limited to, the eBay Partner Network.
Thought I'd contribute my experience with a 2006 MPV that I worked on this week. This MPV has power doors, but no security system (although I don't think it would matter for this repair).
Both the sliding side doors and also the rear hatch electric locks were failing and would require several presses of the door lock button to get them to work. Occasionally I had to lock them manually. You could hear the actuator clicking and the locks would move slightly, but the actuator didn't have enough power to do the job. I figured it was time to replace the electric door lock actuators. The rear hatch and side door actuators are $160-200 new, so I decided to buy and install new Mabuchi servo motors instead of replacing the whole actuator part.
I referred to this thread a lot, but it's for a Mazda5 and the door trim, lock and actuator are different on a MPV van. I started with the MPV rear hatch door lock actuator. It was relatively easy to access. I gently pulled the side window trim off the rear hatch, and then pulled and popped out the lower panel at the lower edge until it was only hanging from the window side, then lifted that off and set it aside. Once inside, the actuator is attached to the door latch, so the latch has to be removed. I unbolted the 3 bolts (that held the latch in place) at the bottom of the outside of the hatch. Then, from the inside of the panel, I unhooked the two electric wire connectors using the flat blade of a screw driver, and also disconnected the 2 control rods attached to the lock mechanism. Then the whole latch/actuator assembly easily came out. Once out, I unscrewed the actuator from the latch and began the process of opening it to get to the little Mabuchi servo motor that powers the actuator.
The actuator looked different from the ones shown in the Mazda5 thread. The MPV rear actuator is a simple device with only one (2 wire) connection. I had to split it open with a razor knife and screw driver to access the servo motor. It split open relatively easy. Inside was pretty simple: a 2 wire connection to the servo motor, and a worm gear engaged with a round, toothed gear to control the lock lever. (A very simple device, and certainly not worth $200). I popped the mabuchi servo motor out, and replaced it with a new one I purchased on ebay for $4. (See my below note on the servo coupling). Since the actuator case didn't have screws to keep the case together, I glued the two case halves together with shoe goo. I wanted a strong glue to keep the case together, but soft and flexible enough if I had to crack the case to access it again. I believe it's important to glue it together, because the motor puts a lot of torque on the gears, and when I tested it without being glued, the gear slipped.
Next I worked on the side door locks. To access them, I had to remove the inside door latch, using a trick I
. I opened the side, sliding door about 6 inches, and starting from the bottom, gently pulled the door panel away from the door. Once the inside door panel was off, the actuator was easy to access. Two screws hold it in place. Once the actuator is out, it was dangling by 4 wires entering the case. There was NO connector for the wires, so I had to unscrew the 4 screws holding the actuator case together, and access the servo motor still connected to the power wires. I used a small screw driver to pry up the servo motor. It was an unusual connection, with 2 wires connected to the servo with contacts that inserted into the female servo power connection. I had to pull them out individually, mark them, and leave them hanging, while I installed the new servo. (See note below on preparing the new servo by installing the coupling). I had to insert the two loose connectors into the new servo with my thumb, and then press them in with the flat blade of a screw driver. It was tricky and at first I didn't think they were going to fit, but they did. I lubricated the gears and put the 2 halves of the actuator case back together and used the 4 screws to hold it together. (No need for glue on this one). Then I reinstalled the actuator into the door with the 2 screws. Later, after testing, I reinstalled the door panels. All in all, it was a relatively easy fix, that saved about $600 for the 3 door actuators I worked on, so very worthwhile.
Note: The Mabuchi servo on the MPV is different from the ones shown in many other Mazda threads. I referred to this Lexus forum thread for help with removing/installing the coupling, because it uses the same servo and coupling setup. The servo has a metal coupling that slides on the 10mm round power shaft that protrudes from the servo. You have to remove the coupling and install it on the new servo. I tried holding the shaft, under the coupling, with a pair of needle nose pliers and then tapping the shaft from above with a small rod (I used a small allen wrench) to try and tap the shaft out of the coupling. It didn't work. I was afraid I would damage the coupling. Others have tried heating the coupling and tapping it, but then they complained that it didn't fit snugly on the new servo shaft. I ended up buying a small Walkera motor pinion gear puller on ebay, and using it to remove the coupling. It worked adequately well, even though it's not a high quality metal puller. It made the job easier.
One other thing I'll mention, is that after doing the above repair, I tested the locks and found out they worked backwards. When I hit the door lock button on the remote, they UNLOCKED the doors I worked on. As it turns out, I apparently ordered reverse polarity servos. They were marked as appropriate for Mazda, but apparently not for the MPV. I had to cut the power wires to the actuators I repaired and reverse the polarity, by connecting positive to negative wire, etc. I'm not proud of this jack leg approach, but I didn't want to order new servo motors, and reinstall them. So be careful what motors you purchase.
Here's the servos I purchased from ebay that turned out to be reverse polarized for the MPV:
4pc Mabuchi FC-280PC-22125 Door Lock Motor/Actuator 280PT 20150 DIY Repair Mazda.
Seller was "nooelec". The listing didn't show the servo rotation direction or polarity.
I didn't document the whole process in pictures, but here are a couple I took, that may help someone else trying this same repair on a MPV.
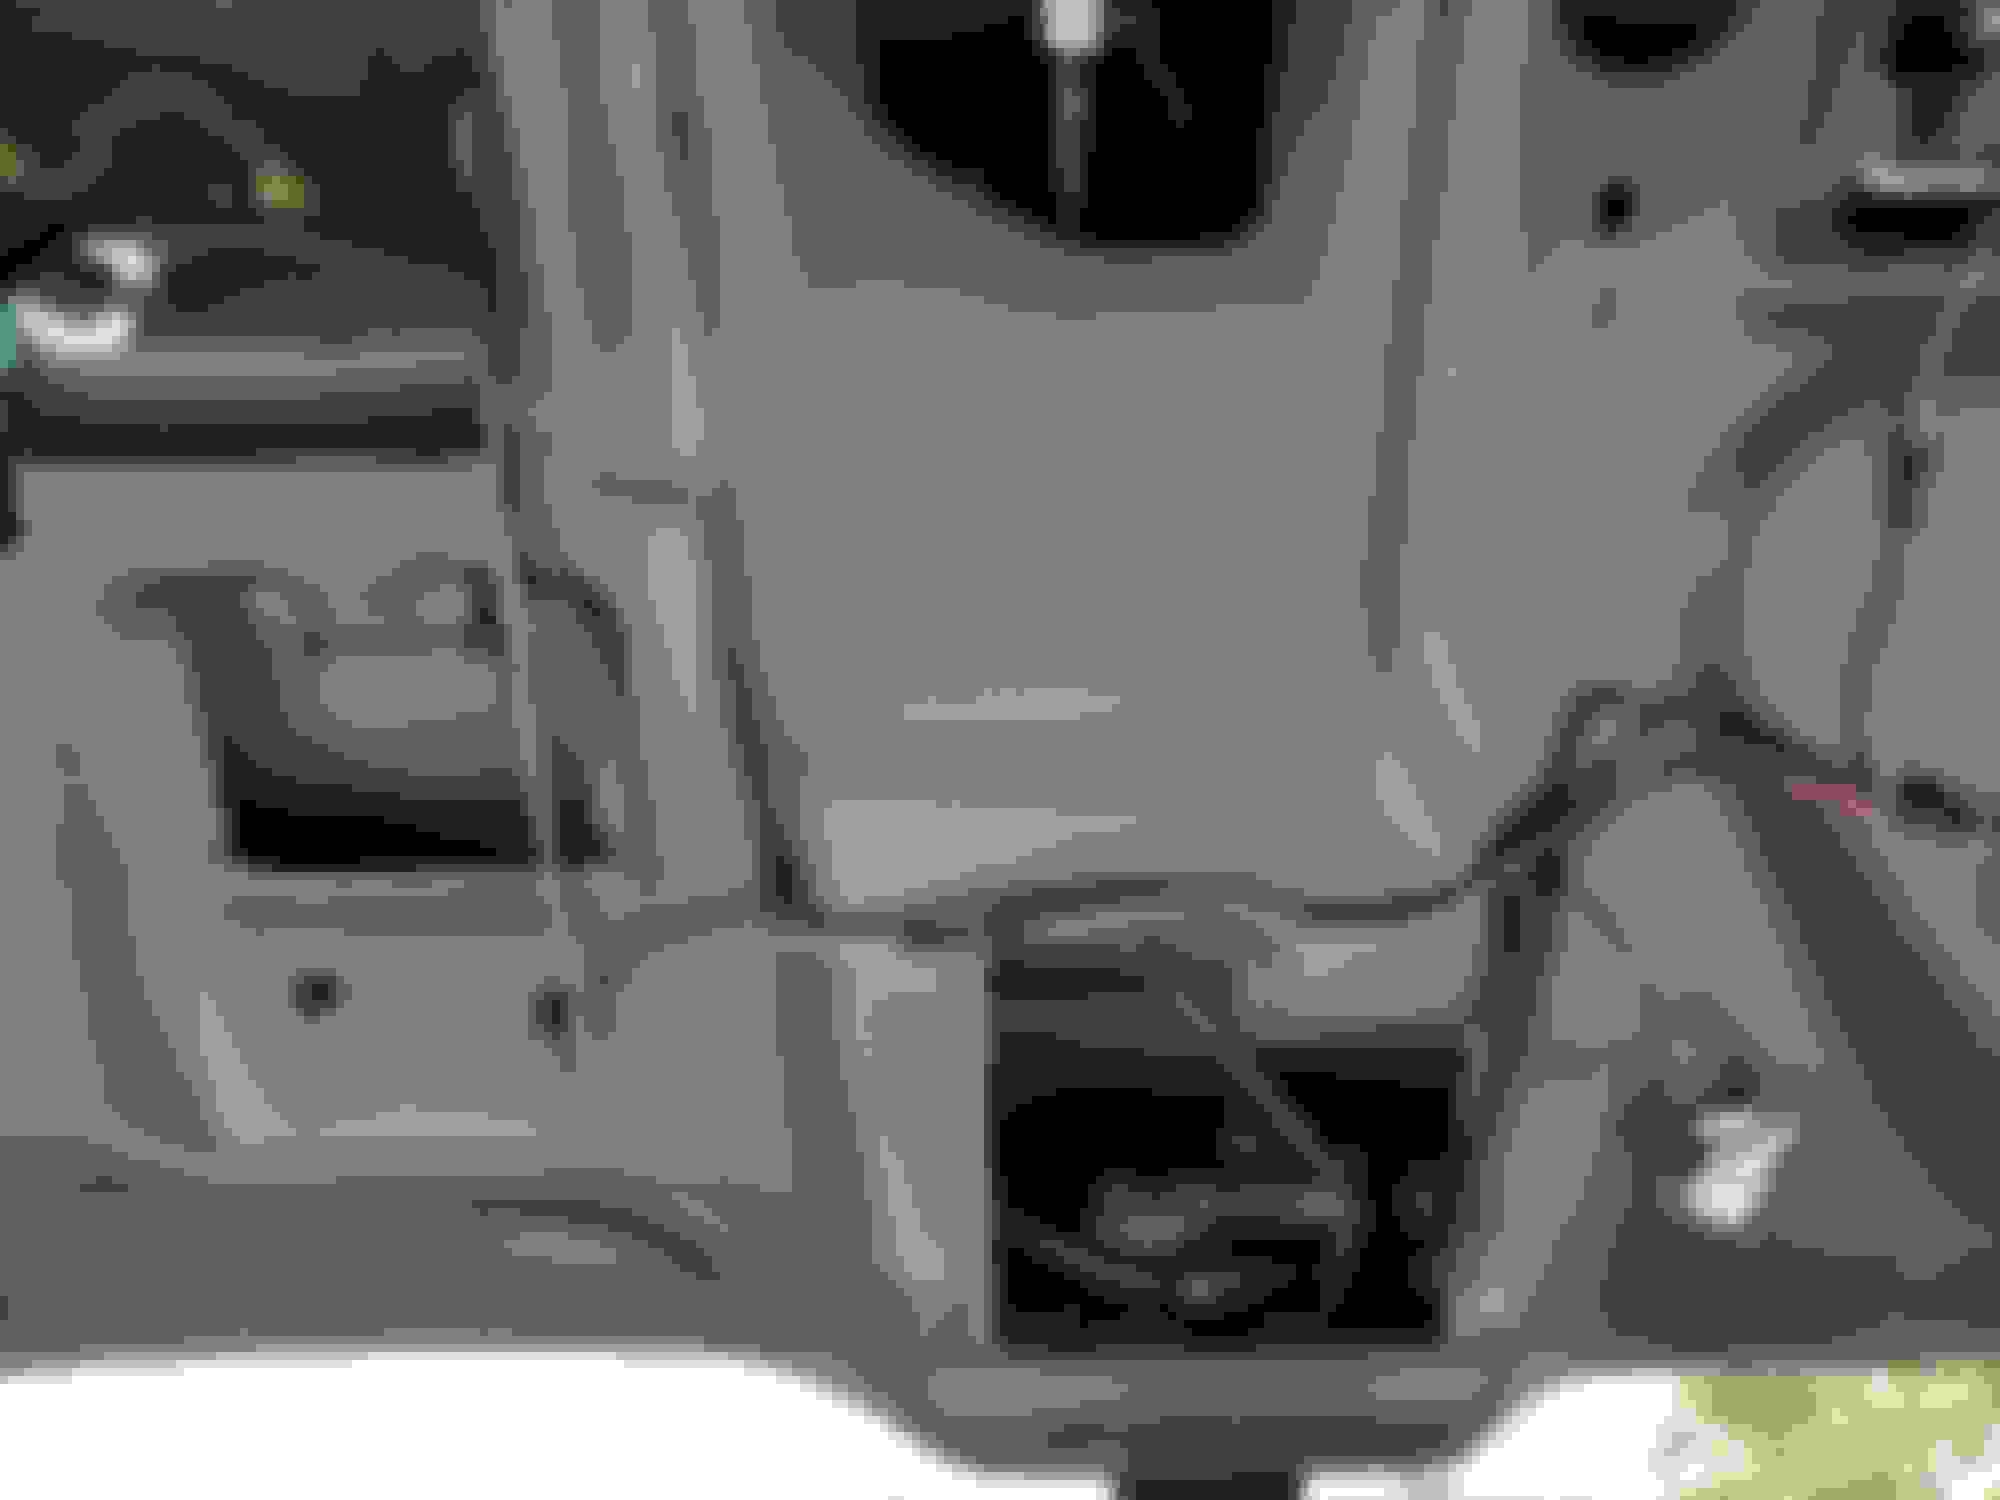
This is the sliding side door actuator removed and disassembled (the servo and wires are out): This is the sliding side door actuator split apart with the servo and worm gear out. This is the servo motor with worm gear used in the rear hatch and sliding side doors of the MPV. You have to move the worm gear and it's coupling to the new servo. This is the rear hatch actuator from the MPV. It's still hanging from it's wiring before I disconnected it. I had to cut this open along the side seam to access the servo. Once it started to split open it came the rest of the way pretty easily. This is the rear hatch actuator in place with the control rods connected before removing it from the door. Rear hatch with actuator showing at the bottom. Rear hatch latch with actuator detached.
Thought I'd contribute my experience with a 2006 MPV that I worked on this week. This MPV has power doors, but no security system (although I don't think it would matter for this repair).
Both the sliding side doors and also the rear hatch electric locks were failing and would require several presses of the door lock button to get them to work. Occasionally I had to lock them manually. You could hear the actuator clicking and the locks would move slightly, but the actuator didn't have enough power to do the job. I figured it was time to replace the electric door lock actuators. The rear hatch and side door actuators are $160-200 new, so I decided to buy and install new Mabuchi servo motors instead of replacing the whole actuator part.
I referred to this thread a lot, but it's for a Mazda5 and the door trim, lock and actuator are different on a MPV van. I started with the MPV rear hatch door lock actuator. It was relatively easy to access. I gently pulled the side window trim off the rear hatch, and then pulled and popped out the lower panel at the lower edge until it was only hanging from the window side, then lifted that off and set it aside. Once inside, the actuator is attached to the door latch, so the latch has to be removed. I unbolted the 3 bolts (that held the latch in place) at the bottom of the outside of the hatch. Then, from the inside of the panel, I unhooked the two electric wire connectors using the flat blade of a screw driver, and also disconnected the 2 control rods attached to the lock mechanism. Then the whole latch/actuator assembly easily came out. Once out, I unscrewed the actuator from the latch and began the process of opening it to get to the little Mabuchi servo motor that powers the actuator.
The actuator looked different from the ones shown in the Mazda5 thread. The MPV rear actuator is a simple device with only one (2 wire) connection. I had to split it open with a razor knife and screw driver to access the servo motor. It split open relatively easy. Inside was pretty simple: a 2 wire connection to the servo motor, and a worm gear engaged with a round, toothed gear to control the lock lever. (A very simple device, and certainly not worth $200). I popped the mabuchi servo motor out, and replaced it with a new one I purchased on ebay for $4. (See my below note on the servo coupling). Since the actuator case didn't have screws to keep the case together, I glued the two case halves together with shoe goo. I wanted a strong glue to keep the case together, but soft and flexible enough if I had to crack the case to access it again. I believe it's important to glue it together, because the motor puts a lot of torque on the gears, and when I tested it without being glued, the gear slipped.
Next I worked on the side door locks. To access them, I had to remove the inside door latch, using a trick I saw on this youtube video. I opened the side, sliding door about 6 inches, and starting from the bottom, gently pulled the door panel away from the door. Once the inside door panel was off, the actuator was easy to access. Two screws hold it in place. Once the actuator is out, it was dangling by 4 wires entering the case. There was NO connector for the wires, so I had to unscrew the 4 screws holding the actuator case together, and access the servo motor still connected to the power wires. I used a small screw driver to pry up the servo motor. It was an unusual connection, with 2 wires connected to the servo with contacts that inserted into the female servo power connection. I had to pull them out individually, mark them, and leave them hanging, while I installed the new servo. (See note below on preparing the new servo by installing the coupling). I had to insert the two loose connectors into the new servo with my thumb, and then press them in with the flat blade of a screw driver. It was tricky and at first I didn't think they were going to fit, but they did. I lubricated the gears and put the 2 halves of the actuator case back together and used the 4 screws to hold it together. (No need for glue on this one). Then I reinstalled the actuator into the door with the 2 screws. Later, after testing, I reinstalled the door panels. All in all, it was a relatively easy fix, that saved about $600 for the 3 door actuators I worked on, so very worthwhile.
Note: The Mabuchi servo on the MPV is different from the ones shown in many other Mazda threads. I referred to this Lexus forum thread for help with removing/installing the coupling, because it uses the same servo and coupling setup. The servo has a metal coupling that slides on the 10mm round power shaft that protrudes from the servo. You have to remove the coupling and install it on the new servo. I tried holding the shaft, under the coupling, with a pair of needle nose pliers and then tapping the shaft from above with a small rod (I used a small allen wrench) to try and tap the shaft out of the coupling. It didn't work. I was afraid I would damage the coupling. Others have tried heating the coupling and tapping it, but then they complained that it didn't fit snugly on the new servo shaft. I ended up buying a small Walkera motor pinion gear puller on ebay, and using it to remove the coupling. It worked adequately well, even though it's not a high quality metal puller. It made the job easier.
One other thing I'll mention, is that after doing the above repair, I tested the locks and found out they worked backwards. When I hit the door lock button on the remote, they UNLOCKED the doors I worked on. As it turns out, I apparently ordered reverse polarity servos. They were marked as appropriate for Mazda, but apparently not for the MPV. I had to cut the power wires to the actuators I repaired and reverse the polarity, by connecting positive to negative wire, etc. I'm not proud of this jack leg approach, but I didn't want to order new servo motors, and reinstall them. So be careful what motors you purchase.
Here's the servos I purchased from ebay that turned out to be reverse polarized for the MPV:
4pc Mabuchi FC-280PC-22125 Door Lock Motor/Actuator 280PT 20150 DIY Repair Mazda.
Seller was "nooelec". The listing didn't show the servo rotation direction or polarity.
I didn't document the whole process in pictures, but here are a couple I took, that may help someone else trying this same repair on a MPV.
This is the sliding side door actuator removed and disassembled (the servo and wires are out): This is the sliding side door actuator split apart with the servo and worm gear out. This is the servo motor with worm gear used in the rear hatch and sliding side doors of the MPV. You have to move the worm gear and it's coupling to the new servo. This is the rear hatch actuator from the MPV. It's still hanging from it's wiring before I disconnected it. I had to cut this open along the side seam to access the servo. Once it started to split open it came the rest of the way pretty easily. This is the rear hatch actuator in place with the control rods connected before removing it from the door. Rear hatch with actuator showing at the bottom. Rear hatch latch with actuator detached.
2004-2006 for SCION xB 2000-2005 for TOYOTA Echo 746-634 actuator and can be used for Mazda MPV tailgate power lock actuator as it is completely the same and the cost of it is $12!!
I have babied my 2010 Honda Fit (base model) since I bought it new. Last year one of my rear door lock actuators stopped working and the dealer wanted to charge me $500 to replace the whole assembly. I decided to take the whole thing apart myself and actually find/fix what was wrong. After removing the door panels, window, part of the window channel, and the exterior handle I was able to get the whole mechanism out and upon complete teardown found that it was only a 3$ motor NoxVidmateVLC that had burned out and would be easily replaced.


 ))) ��
��. It�s an actual
))) ��
��. It�s an actual 
