
Front bumper removal


Super Moderator
Joined: Mar 2007
Posts: 8,666
Likes: 0
From: Manor, TX (Outside of Austin)
You mean... like this> > > > > >
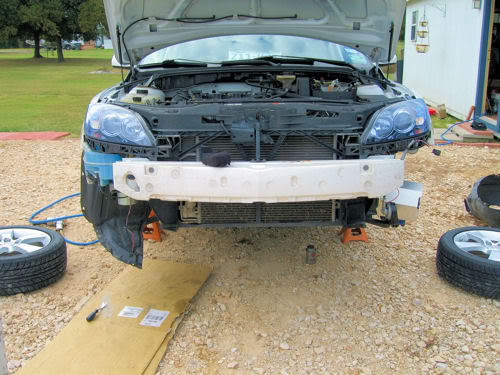
It's really easier than you'd think.It'sall 10mm and phillips head screw stuff.
Remove all the bolts for the front lower splash shield, not the shield you loosen/remove to change oil. I think there are8 or 10 across the front bumper cover.
Loosen both inner fender wells (plastic shields) so that you have access to the inner fender and remove the two bolts (each side)there that hold the bumper cover to the fender.
Disconnect your fog lights and the wiring harness clip.
Here's where there is some difference between the HB and the sedan.
For the HB, locate the two hood bumpers. Underneath them, between the two pieces of plasticis a place for a small prying tool (a screwdriver.) If they need to be turned to see it they will do that easily. Pry up the top portion, then pull up on theentire plastic clip assem to remove it. It's works like one of those stupid interior clips but is a lot stronger. Do not remove the rubber bumper from the plastic clip that it's in. Not a necessary step.
Next and last, remove the two large screws on the top of the bumper next to the bumpers you just removed and carefully remove the bumper cover itself. That's it!
I think on the sedan the grill has to be removed also, but I don;t know the steps.
I wrote this from memory, so if I forget some little step as I said, it's not that hard. Just take your time and don't do a rip 'n' tear as we used to call it in the business and you'll be fine.

Thread Starter
|
Senior Member
Joined: Jan 2006
Posts: 346
Likes: 0
From: New Paltz, NY
Thanks a lot Virg. I remember reading that it was an easy bumper to remove. All i need to do is take out my headlight and get to the ONE hidden screw. Ehh, I see it as a good learning process to taking apart my car for any future mods i might want to perform.

Senior Member
Joined: Sep 2007
Posts: 281
Likes: 0
From:
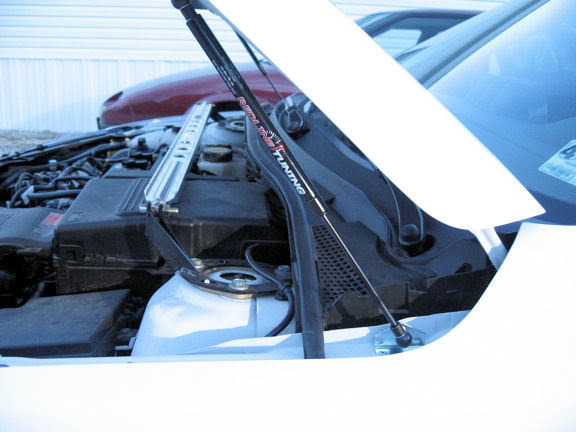
Virgin, how come you have different hood support rod. You've got a pair of short one near firewall, I only have one longer one at the front bumper......
________
sexyJenny live
________
sexyJenny live
Last edited by wineye; Sep 15, 2011 at 05:24 PM.

Super Moderator
Joined: Mar 2007
Posts: 8,666
Likes: 0
From: Manor, TX (Outside of Austin)
Check here, Element:
http://www.redlinetuning.com/products_quicklift.html
BTW: If you decide to do it, use lots of multi-layered electrical tape on the nearby painted surfaces, especially exposed edges. They don't tell you that on te instruction sheet, but after my first lil' mishap, I learned VERY quickly.

Thread
Thread Starter
Forum
Replies
Last Post
mazdatree
Mazda3
7
Nov 16, 2008 08:37 PM