Rear Liftgate Struts Replacement
#1
 05-11-2010, 02:08 PM


Hello all....long time, no talk to!
Question: On my '04 6s wagon, are the rear liftgate struts easy to replace? Mine have given up, and it looks like you maybe just kinda 'pop' them off of the mounts. Is that true, or is there more disassembly to it? Do any of you have first-hand experience with this? Thanks!
David
Question: On my '04 6s wagon, are the rear liftgate struts easy to replace? Mine have given up, and it looks like you maybe just kinda 'pop' them off of the mounts. Is that true, or is there more disassembly to it? Do any of you have first-hand experience with this? Thanks!
David
#2
05-18-2010, 11:56 PM

This is most definitely something that can be done at home. The hatch struts are sold as one piece and typically fit very easily into a hatch bracket or are secured with bolts on the top and bottom. The hatch will need to be opened, the lid will need to be firmly secured in place to make sure it doesn't close without the struts, and the bolts will need to be undone at both the top and the bottom. The new strut can be placed into the old strut's place and secured with the new bolts. Some cars make this more difficult than others so consult your owner's manual.
Good Luck...
Good Luck...
#3
05-19-2010, 03:05 PM
Thanks mate.
When my wife went to the dealership to pick up the struts, they popped them on for free! Guess she shot them some leg, or something.
David
When my wife went to the dealership to pick up the struts, they popped them on for free! Guess she shot them some leg, or something.
David
#4
05-19-2010, 06:18 PM

Well, I'm a leg man. If she has nice legs.... GIVE, Bro!!

The only problem is that now you didn't really learn anything. Now you don't know (and neither do we) whether they "pop" on or bolt on?
BTW: A 2"x4" of the roughly proper length usually works great for holding up hatches and tailgates under those circumstances.
#5
01-10-2011, 08:28 AM

Bit of a thread resurrection, but I just got a pair of hatch struts for my '04 6 (aftermarket, cost me �37 compared to dealer �60). I haven't fitted them yet, but they look like they'll just pop off/on. I'll update here when I've put them on, need to find a suitable length of wood first 
Last edited by steveeeee; 02-06-2011 at 10:06 AM.
#6
02-06-2011, 10:21 AM
Right, finally got round to doing this today. Couldn't find a big enough piece of wood, so my dad held the hatch open for me instead I took pics of the process in case they might be useful to someone else on here who needs to do the same thing. I assume the process would be the same for the estate/wagon.
These were the original struts:
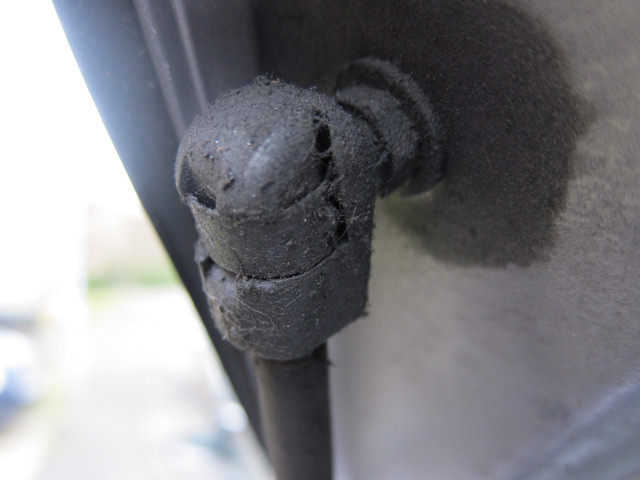
Top mount. I guess that goo is what has leaked out of the struts over the years.

Bottom mount. Notice that each has a little slot that a screwdriver could fit in. This is for the retaining ring/clip.

Use a screwdriver to lever out the retaining rings. They might pop off and go rolling down the street like mine did. Once the rings are off, the struts should pull away from the mounts quite easily but might need a gentle tap from a mallet or lump of wood.

Strut removed, upper mount.

Lower mount.

New strut going on, upper mount. Remove any retaining clips/rings from the new struts first and make sure to apply grease to each ball mount.

New strut, lower mount. After fitting, put on any retaining clips/rings. My new struts were not OEM so the clips were a different design.

Repeat on other side and the job is done! Nice fast-lifting hatch with no squeaks.
I took pics of the process in case they might be useful to someone else on here who needs to do the same thing. I assume the process would be the same for the estate/wagon.These were the original struts:
Top mount. I guess that goo is what has leaked out of the struts over the years.
Bottom mount. Notice that each has a little slot that a screwdriver could fit in. This is for the retaining ring/clip.
Use a screwdriver to lever out the retaining rings. They might pop off and go rolling down the street like mine did. Once the rings are off, the struts should pull away from the mounts quite easily but might need a gentle tap from a mallet or lump of wood.
Strut removed, upper mount.
Lower mount.
New strut going on, upper mount. Remove any retaining clips/rings from the new struts first and make sure to apply grease to each ball mount.
New strut, lower mount. After fitting, put on any retaining clips/rings. My new struts were not OEM so the clips were a different design.
Repeat on other side and the job is done! Nice fast-lifting hatch with no squeaks.
Last edited by steveeeee; 07-30-2013 at 05:30 AM. Reason: Updated pic links
#7
12-31-2011, 10:02 AM

It was so nice of you to include the photos. They were very helpful. My 2003 MPV has a similar upper mount ball, with no visible clip holding it on. Try as I and my husband might, we can't pry the old strut off that little ball. What are we doing wrong? My husband is afraid to break it, as he breaks a lot of stuff.
We'll take any advice. That door weighs a ton and I can't use the trunk area at all with it falling on my back like that!
We'll take any advice. That door weighs a ton and I can't use the trunk area at all with it falling on my back like that!
#8
12-31-2011, 12:50 PM
There's a little wire clip that wraps around the base of the ball socket then pokes through a hole in the bottom of it to retain it (so that it doesn't just pop off at any old time.)
Simply get a small tool in there, even a pocket knife will do, turn it until its clear of the base and pull down.
Be sure to reinstall them with the new struts.
#9
12-31-2011, 05:13 PM
It was so nice of you to include the photos. They were very helpful. My 2003 MPV has a similar upper mount ball, with no visible clip holding it on. Try as I and my husband might, we can't pry the old strut off that little ball. What are we doing wrong? My husband is afraid to break it, as he breaks a lot of stuff.
We'll take any advice. That door weighs a ton and I can't use the trunk area at all with it falling on my back like that!
We'll take any advice. That door weighs a ton and I can't use the trunk area at all with it falling on my back like that!


Apologies for the quality of the pics, it's dark out there just now
The clip goes round the back of the socket (first pic) and then a straight part goes right up through the socket itself (second pic), locking it onto the ball.I haven't tried to remove them again but it looks like that I'd need to grab that tab on the first pic and rotate it around the back of the socket, and then pull the whole clip carefully down to get the straight part out. Repeat at both ends, and the strut should come away easily. Hope that helps.
