2014 Mazda 6 Project


Thread Starter
|
Member
Joined: Apr 2013
Posts: 36
Likes: 0
I went back to the guys that wrapped my roof. I first asked for scraps for the trial fits, I bought a small roll for the final. I wanted the look of the 6 concept car, 2 templates and 4 tries and it finally worked.
The 6 doesn't come with the shallow removable tray. I hated the depth of the center console...except when I'm smuggling .99 cent cans of Arizona Iced Tea. I just found the space unmaximized. It seemed to have been designed for a tray, but one was never made.
The 6 doesn't come with the shallow removable tray. I hated the depth of the center console...except when I'm smuggling .99 cent cans of Arizona Iced Tea. I just found the space unmaximized. It seemed to have been designed for a tray, but one was never made.
Last edited by Monkee; Jun 1, 2013 at 08:46 AM.

Junior Member
Joined: May 2013
Posts: 10
Likes: 0
For those of us really into these new 6's, you're sorta a minor celebrity. Can't wait to see your new intake, and whatever you do next.
The engine cover was a great idea, and the shallow tray is cool. Although I'll be totally taking advantage of the tea smugglers bin between the seats when I pick up the diesel 6, this winter.
My guess is that while the box was designed specifically for the new 6, it wasn't cost effective to redesign all the tooling so the top lip of the console remains tray-ready even though one was not provided or made. A forgivable cost cutting measure in the rebirth of a great car nameplate.
2 questions for you: I'm assuming that the badges were just 2-sided tape'd on. You use the hair dryer and floss method for removal?
You have any plans to add a power outlet to the rear face of the center console for passengers? That's going to be huge for me, with 2 kids on long trips etc.
Again, great and tasteful work.
Thread Starter
|
Member
Joined: Apr 2013
Posts: 36
Likes: 0
2 questions for you: I'm assuming that the badges were just 2-sided tape'd on. You use the hair dryer and floss method for removal?
You have any plans to add a power outlet to the rear face of the center console for passengers? That's going to be huge for me, with 2 kids on long trips etc.
Again, great and tasteful work.
You have any plans to add a power outlet to the rear face of the center console for passengers? That's going to be huge for me, with 2 kids on long trips etc.
Again, great and tasteful work.
Thanks, my GF thought I was crazy for doing all of the mods in 2 weeks after purchasing the car. The first was the exhaust tips, that was done within 48 hours of owning it. Now it's just tge little touches like the headrest coat hanger(you can see it on the LED pic on the passenger side. Also the lock latch covers I found from an over seas dealership for $3.00. I really don't have a lot of time on my hands, just an obsessive mind. Also check out the Niche website, my car got its 15 minutes of fame.
Let me know how the diesel when you get it, I'm very interested. Now that all the cosmetic stuff is done, the search for power begins!
Thread Starter
|
Member
Joined: Apr 2013
Posts: 36
Likes: 0
Here is the trick I've used when it comes to covering up those emblem holes on the trunk. First, remove the retainer tabs out of the hole. Been doing this to all the cars I've owned.
Items needed: Electrical tape (same or close to your car color), scissors, your dealer brochure(optional), touch up paint(optional).
Just tape- cut about a 1.5" in strip of tape then cut another piece big enough to cover the hole. You basically have a rectangle and a square of electrical tape. Take the square and tape it in the center of your rectangle adhesive to adhesive. From the inside stick that rectangle over the hole making sure the square is center of the hole. Make another for the other hole.
Touch up paint- use the same steps, but paint the square before covering the hole.
Car brochure- these is usually a laminated or glossy paint color sample in the back cover. Cut that out in place if the square and place it in the rectangle and cover the hole.
Hope this simple idea works for you.

Thread Starter
|
Member
Joined: Apr 2013
Posts: 36
Likes: 0
The muffler tips were generic double slash cut stainless steel tips. They were sold at both muffler shops that I went to, they were about $20 each. I found the pedals on eBay. Look for 2013 CX-5 aluminum pedals and they'll show up. It was shipped from China. They are excellent quality.
Junior Member
Joined: May 2013
Posts: 10
Likes: 0
Also the lock latch covers I found from an over seas dealership for $3.00. I really don't have a lot of time on my hands, just an obsessive mind. Also check out the Niche website, my car got its 15 minutes of fame.
Let me know how the diesel when you get it, I'm very interested. Now that all the cosmetic stuff is done, the search for power begins!
Let me know how the diesel when you get it, I'm very interested. Now that all the cosmetic stuff is done, the search for power begins!
I couldn't find the niche website to which you refer. Have a link?
Thread Starter
|
Member
Joined: Apr 2013
Posts: 36
Likes: 0
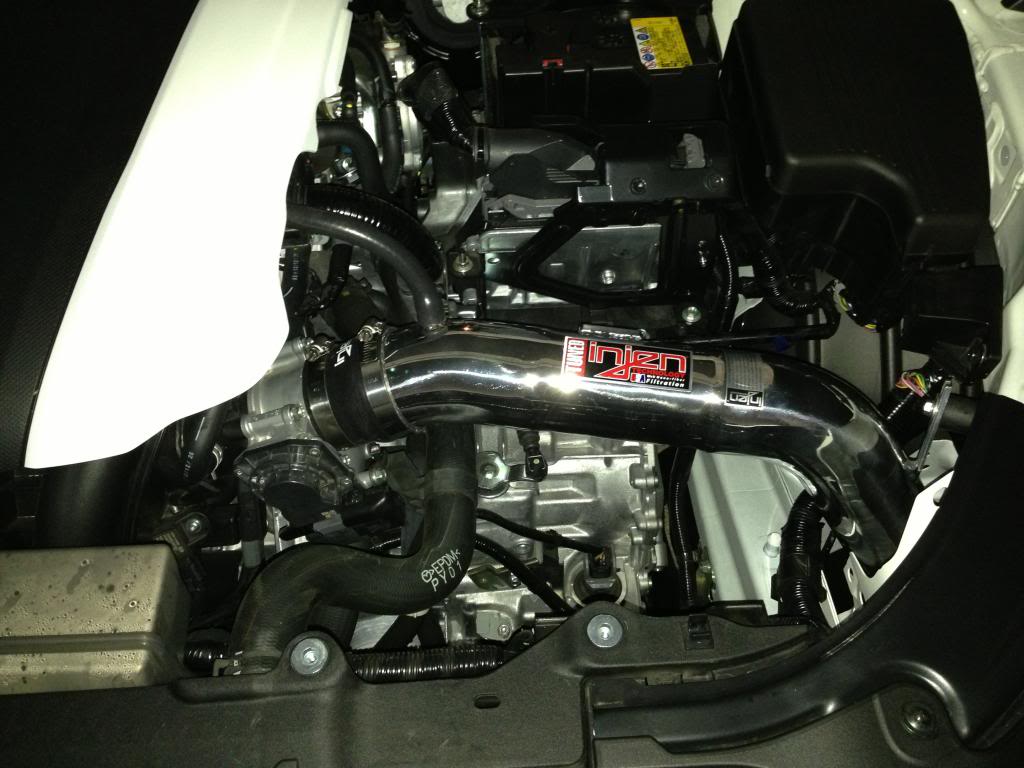
I'll post more pics soon, they are these diamond shaped plastic covers that covers up the screws on your door latches...small detail. Type in Niche M129, it will pop up. I just picked up the Injen cold air intake, just waiting...anyone interested in a K&N drop in filter?
Thread Starter
|
Member
Joined: Apr 2013
Posts: 36
Likes: 0
Ta Da! New and improved Injen CAI. They used my car for R&D after CEL went off on a few cars running their original design. New sensor placement amongst other changes and more power that can be felt right away.